A deck is an outdoor living space that can enhance a home’s value and function. The project can be done on your own or with the help of a professional.
A professional contractor may be necessary for complex designs or to ensure the project is up to code and complies with regulations. This includes securing the right permits and inspections. Contact Deck Builders Franklin TN for professional help.
Site preparation is one of the first steps in building a deck, and it sets the stage for all other construction activities to follow. It includes clearing the area of debris and ensuring that there are no underground obstructions that might prevent or delay construction. It also involves preparing the soil by grading and tamping to ensure that it has a solid base.
Once the foundation is in place, contractors can begin installing the deck frame. This consists of joists and beams, typically made from pressure-treated lumber, as well as concrete footings to anchor the deck to the ground. Stair stringers and treads, if your deck is elevated above ground level, are also essential for safety and accessibility. They should be constructed from durable materials like wood, composites, or metal to complement the rest of the deck and maintain a consistent look.
Next, the deck’s ledger board is attached to the house framing, and waterproof flashing is installed to prevent water damage. Then, the post holes are dug and filled with concrete to secure the posts. Once they’re set, joists are attached to the posts and to each other.
Once the joists and decking are in place, a fascia board is fastened along the edges of the deck to conceal the ends of the joists and provide a finished appearance. A final walkthrough is performed to make sure that all fasteners are flush and properly secured, and that the deck boards are evenly spaced and trimmed to create a smooth surface. Then, the deck is ready to be used. Decking is a great way to increase your home’s value and add a comfortable outdoor living space for relaxing or entertaining. By following the proper installation process, you can enjoy your new deck for years to come.
Post Holes
Whether you’re installing a simple deck or incorporating more elaborate features, your deck will only be as strong as its foundation. The post holes are the first step in creating that foundation. Depending on your local building codes and soil conditions, you may need to dig deep concrete footings or use a pre-fabricated form that can be set in place. Our deck plans are designed for poured footings, but you may want to check with your local code enforcement to see what is required in your area.
Before digging, create a grid on the ground with stakes or batter boards to mark the locations of each post. A framing square makes a handy tool for setting batter boards, which are made of two 1x2s driven into the ground at a right angle to each other. Tie one of the batter boards to a string you’ve placed across the corner stakes to create a straight line that runs down the center of your deck. Set a plumb bob at the intersection of the lines to locate the precise location for the post.
Dig each footing hole at least 48 inches deep (check your local code for requirements) and 10 to 12 inches wide, centered on the marks you’ve made in the batter board grid. Shovel dirt back into the hole to backfill around the cardboard footing form and then level the top of the form using a wrecking bar or small shovels to ensure it stays vertical. Add about 6 inches of gravel to each footing hole to provide drainage and minimize contact between the concrete and moisture. Then, place a cylindrical concrete form into each posthole and fill it with concrete to shape the pillar that will hold your deck.
Pouring Concrete
Poured footings require a lot of time and work to install. They involve placing forms in the ground and filling them with concrete, which you then secure to your deck posts. However, buried post footings are a much more efficient option that can help save you time and money.
Buried post footings are made of concrete, just like poured concrete, but they’re buried in the ground rather than sitting on top of it. They’re perfect for decks that need extra stability, such as those with hot tubs or overly large deck structures. They’re also ideal for decks that are elevated off the ground.
The key to a good footing is a quality sub-grade. Granular soils compact easily and have the highest load-bearing strength. Soft or clay based soils have lower load bearing strength and can heave when they retain moisture. To minimize these issues, you should mix in some sub-grade soil to improve the composition of the soil before pouring your concrete.
Once you’ve poured your concrete, it needs to be compacted for a smooth surface and cured for a durable finish. This is a labor-intensive process that can be hampered by rain, wind and other weather conditions. It’s important to monitor the site during the curing process to avoid unexpected delays.
If you want to speed up your installation and ensure a consistent finish, use a power drill with a bit that’s specifically made for composite materials. This will prevent the screws from damaging or splitting the boards, resulting in a sloppy finish. Another pro tip is to use a template to maintain uniform screw placements. This helps you achieve a more professional finish and will make it easier to remove and replace boards in the future.
Ledger
The ledger is a piece of pressure-treated or naturally rot-resistant dimensional lumber that supports the ends of deck joists. It’s the link between your house and the deck that transfers loads from the deck to the foundation, so it’s critical that it’s properly attached. If it’s not, the entire deck could collapse.
Unlike many other parts of a deck, the ledger is bolted directly to the house. This is because the connection is under considerable load, and a failure of the ledger would likely cause significant structural damage to the house. There are several ways to attach the ledger, depending on the type of house and the age of its framing. Consult a building inspector or engineer before starting your project to learn what method is best for your situation.
Practical Tip
To prevent water from entering behind the wall cladding and into the wood framing of the adjoining structure, you’ll need to install flashing above and below the deck ledger. This may require removing part of the wall cladding to ensure you have a clear working surface.
Lag screws or hex-head bolts should be used to fasten the ledger to the rim joist of the house, and they should be spaced as recommended by the International Residential Code. In general, the IRC recommends two rows of lag screws or hex-head bolts with a minimum distance of 8 inches between each row.
When drilling the holes for the lag screws or bolts, it’s important to mark the position of each anchor on the ledger and on the wall with a pencil and a tape measure. This helps you to ensure each hole is positioned correctly and at the correct height.
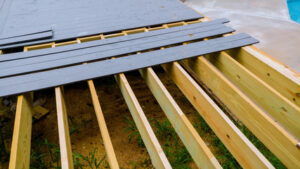
Decking
A deck is a wood framed platform that is attached directly to the home. It is often built in the backyard, but can be located anywhere on the property. The deck can be a wood framed patio, a covered porch, or an enclosed sunroom. A deck can be made of either wood or composite materials. Wood decking is usually made from natural timber, but can be constructed using engineered or pressure-treated wood as well.
The structure is built from joists, beams, and footings. The joists are hefty framing members, typically 2x stock or higher, that span the deck space. The joists are connected by beams or bridging, short pieces of lumber used to strengthen the framing and prevent twisting. Footings are concrete columns below grade that support the posts.
After the subframe is in place, it’s time to lay the decking. Decking can be made from a variety of material, but most people choose natural wood for its beauty and affordability. It also takes stains and other finishes beautifully. Composite decking is another popular choice, and is a synthetic construction that combines wood fibers with plastics.
If you choose to use a synthetic decking product, you should follow the manufacturer’s instructions for care and maintenance. It is important to avoid the use of chemicals that can damage the surface or cause it to break down prematurely.
Always pre-drill holes into the deck boards with a drill bit that is the same width as the shank of your fastener. This prevents the boards from splitting as the screw is driven in. When attaching the deck board to the joist, line up the tongue and groove on the side where they touch and drive a trim head screw through the pre-drilled hole at a 45 degree angle into the deck board. This will conceal the screw head and give the deck a pristine look.