There are many factors to consider when deciding whether to repair or replace your roof. A few major ones include your budget, the damage’s extent, and the roof’s age.
The first step is conducting a thorough Roofing inspection to identify any areas that require repair. This usually involves checking for leaks, missing shingles, and deteriorating flashing.
1. Removing the Damaged Shingles
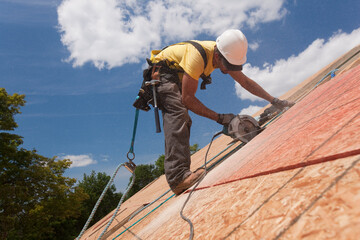
The first step in repairing the roof is to remove the damaged shingles. Use a ladder to access the roof and take all the necessary safety precautions, including a harness and a partner.
Begin by loosening the adhesive underneath the shingle with a flat pry bar. This will help you to remove it without damaging the adjacent shingles. Once the adhesive is loosened, you can pull out the damaged shingle. It’s important to be gentle, as the granules are fragile and can easily be torn off.
It’s also a good idea to inspect the area surrounding the damaged shingle. Often, when one shingle blows off or becomes weathered, others in the same area will follow suit. It’s worth the time to rescuer these shingles before it’s too late, since regularly doing so can extend the life of your roof by years.
Once you’re done removing the old shingle, replace it with a new shingle that’s the same size. Be sure to nail it down with waterproof roofing nails instead of the old ones, as these will last much longer.
Next, remove any remaining nails that were holding the shingle down. Be careful not to puncture the new shingle with these nails, as this could lead to leaks.
If you’re replacing a shingle that’s around a chimney or skylight, be sure to save any metal flashing that may still be intact. You can usually do this by gently pulling nails from it with a pry bar, and then bending it upward to remove the shingles underneath. Also be sure to remove any nails from step flashing (flashing that’s interwoven with the shingles, where the roof abuts a wall) that you want to keep.
2. Removing the Old Flashing
If your roof flashing is damaged, it can lead to costly water damage. In this case, you must remove the old flashing and replace it with new material. It is important to work with experienced professionals for this type of repair. They are fully equipped to handle the job safely, and their workmanship is backed by warranties.
Roof flashing is a vital component of the roof that prevents leaks and other problems by creating an airtight seal at the joints between the roof and other structures like chimneys, skylights, dormers and walls. Flashing is typically made of durable metal that is resistant to rust and other weathering. It is often installed in a stepped fashion that provides an interlocking water-tight structure.
It is important to inspect your flashing regularly and repair it as soon as possible. If left unattended, the caulk and mortar around the flashing can erode over time, allowing water to seep into your home and cause further damage.
To replace the old flashing, first you will need to remove the shingles above the problem area using a pry bar or crowbar. Gently pry up the shingles to expose the flashing underneath. Next, you will need to clean the flashing and surrounding areas thoroughly in preparation for installing the new material.
After the area is clean, you will need to cut a piece of new flashing to size using tin snips. It is important to match the thickness and material of the existing flashing to ensure a tight fit. Before installing the new flashing, you will need to apply roofing cement along the edges to create a watertight seal. For small holes in the flashing, you can use an asphalt patching compound to fill in the hole. Before applying the patch, roughen it up using sandpaper or a wire brush to allow the compound to adhere better.
3. Reattaching the Flashing
A good roof is like a shield that protects everything else in the house. It keeps out fall rains, winter snows, and flying and crawling insects, birds, and animals. But if the shield is broken, everything in the house is vulnerable.
When reattaching the flashing, try to match how it was previously fixed in place. This will give you a better chance of a water-tight seal. If nails are used, they should always be covered by shingles or the siding. Otherwise, use a roofing sealant. Unlike nails, this will not rust and can be safely encased in a piece of flashing. If using step flashing, be sure to select a chimney flashing collar that is correctly sized for the vent pipe size entering and exiting the roof.
4. Applying the New Shingles
If you want your home to be in the best shape possible, and keep its value, a well-maintained roof is key. It’s the first line of defense against falling snow, rain, and debris that can damage everything inside it. It’s important to keep it in good condition, or risk having to spend a lot of money on repairs down the road.
It’s important to know how to shingle a roof correctly in order to avoid leaks and other issues down the road. Fortunately, the process is not as complicated as many homeowners fear. It simply requires a little bit of training and preparation before starting the actual job.
Start by clearing the work area. This means moving any furniture or yard games away from the house and spreading sturdy tarps over any plants that are close to it. The tarps will protect them from dropped tools and other debris.
After clearing the work area, it’s time to start applying the new shingles. This should be done under calm conditions. It’s a good idea to start with the eaves and rake of the roof, and then move onto the rest of the roof as you go.
When installing the first course of shingles, make sure it’s cut to fit properly and that its tab slots line up with those of the existing roof. This will help ensure that the first course of shingles provides adequate weather protection for the rest of the roof. Then, install succeeding courses of shingles using the snapped line as a guide. If the roof has a valley, install new W-shaped flashing made specifically for reroofing jobs. It should be placed over the existing flashing and attached at high points, which are usually the shingle bottoms.
5. Applying the Sealant
It’s important to use a sealant that can hold up against the elements. This will help to prevent moisture from seeping behind flashing, through gaps and other problem areas. Polyurethane sealants are popular as they are effective, long-lasting and easy to apply. They also withstand harsh weather conditions so they will continue to protect your roof after you’ve completed the repair.
Before applying the sealant, you’ll want to make sure that the roof is clean and free of debris. This is especially important if you’re using silicone sealant, as it can easily trap dust and plant debris. Sweep the roof to remove any visible particles and wash it with an organic solvent if necessary. This will help to ensure that the new sealant adheres directly to the roof surface. It’s also a good idea to apply the sealant in the shade as some silicone sealants can be slow to dry.
To apply the sealant, simply load it into a caulking gun and start at the edges of the roof. Work your way around the entire roof, making sure to get into the cracks and crevices. Once you’ve finished, allow the sealant to dry for a few hours before conducting any further maintenance on your roof. You can find more information about this process here.