The Roof Replacement Process – What To Expect From Start To Finish

Your roof is one of the most important aspects of your home. If yours needs replacement, it can be a complicated project to manage.

A good Ellingson Roofing LLC contractor will follow several meticulous steps to replace your roof. These steps are outlined below:

roofing

Permits

One of the most important first steps in a roof replacement is obtaining any necessary building permits from your local municipality. This ensures that your contractor is working within the guidelines of your area’s zoning laws, and will help avoid any potential headaches down the road if the city finds out you haven’t followed the proper process for getting a permit.

The next step is the roof inspection and planning stage, where your roofing contractor will take a close look at your existing roof. This will include a visual inspection of the structure, as well as an interior inspection to assess any potential water damage that may have occurred over time.

After the inspection, your roofing contractor will give you a cost estimate for the roof replacement and provide you with a timeline of when the work will begin. This is a good opportunity to discuss your preferences for the new roof, including the type of material and color. Your roofing contractor will also ask about any special needs your roof might have, such as skylights or solar panels.

During this phase, your roofing team will set up your job site. This will involve covering plants, furniture, and other things that could be damaged by falling debris. Then, your roofing team will begin the tear-off of your old roof. This includes tearing off the old shingles and underlayment down to the roof deck.

Your roofing crew will then remove the old materials and haul them away to be disposed of properly. Most of the materials will be recycled, and some may even be used in future roof projects. The rest will be taken to a special construction dump, which is specifically designed to handle all the different materials used in the roof construction industry.

Once the old materials have been removed, your roofing contractor will inspect the roof deck to make sure it is in good condition. If any areas are weakened or cracked, they will be repaired to provide a stable base for the new roof.

Before the roof removal begins, it is a good idea to clear out your attic and move any items that are stored there to another location. The hammering involved in the roof removal can cause vibrations that might knock things off your walls, so it’s best to move any decorations or other fragile items ahead of time.

Setup

When homeowners decide to replace their roofs, they often have many questions about the process. While it may seem like a big task, a professional roofing contractor will help you every step of the way to ensure a smooth and efficient process. We’ll discuss why you might want to replace your roof, how the process works, and what you can expect from start to finish.

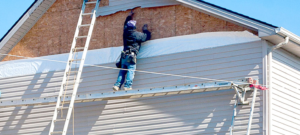
The first step in the roof replacement process is to remove the existing roof. This is a messy and time-consuming part of the job, but your contractor will take multiple precautions to protect your property. They’ll cover sensitive areas of your home and yard with tarps, and use wooden boards to protect things like your garden and air conditioning unit. They’ll also have a dumpster delivered to dispose of the old materials and coordinate the delivery with the tear-off so that they can begin loading your new roof right away.

Once the old shingles are removed, the contractor will inspect and clean the gutters to make sure they’re free of debris. They’ll also blow out any vents on your roof and install a new metal drip edge at the bottom of the roof to prevent water damage. Next, they’ll install a layer of starter shingles on the edges of your roof to provide extra strength and protection where wind and weather tend to do the most damage.

After that, the main shingles will be installed on your roof. They’ll be overlapping each other starting at the eaves and moving toward the peaks. The shingle tabs will be staggered and covered with a sticky adhesive to prevent water from seeping in between them. Finally, the peaks and rake ridges will be capped with specialized ridge vent shingles for additional protection from rain and wind.

Then, the contractors will clean up the entire area around your home. They’ll put the tarps back down and roll them up, and they’ll also have a magnet to pick up any stray nails in your yard. They’ll also clean up any materials that have been tossed into your driveway and garage. This is a crucial step to ensure that your home is protected during the replacement.

Removal Of Existing Roof

If you’re replacing an old roof, the first step is removing the existing one. Many roofing contractors recommend doing a full tear-off of the existing roof, instead of re-roofing over the top. Re-roofing is an option, but it won’t give you the same benefits of a new roof, such as boosted energy efficiency and enhanced curb appeal.

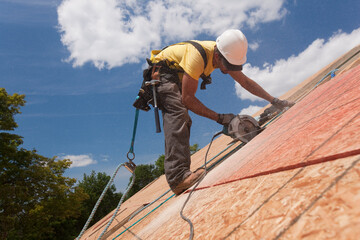
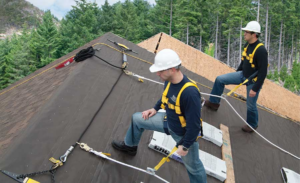
Before beginning the actual work of tearing off an old roof, the contractor will cover bushes and shrubbery that could be damaged by falling debris with tarps. They will also place tarps on the ground to protect areas where they’ll be working, such as around the chimney. They’ll then install their roof jacks, and attach a 2×10 board to help prevent the shingles from sliding off the roof. It’s best to complete this part of the job during clear weather, as it will be easier and faster – not to mention less risky.

Once the roof jacks are in place, your roofing contractor will begin to remove the shingles from the roof in 2- or 3-foot sections. They’ll start with the ridge caps, which are the shingles at the peak of the roof. They’ll work their tool under the shingles, and then pry them loose to let them slide down onto the roof jacks. Once the shingles are removed, the roof deck will be exposed.

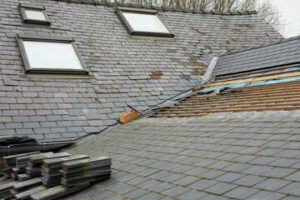
The roof deck will be inspected for any damage that may impact the new roofing system, including wood rot or mold growth. The contractor will then sweep the roof, and if necessary, use a power washer to remove any remaining debris.

A small amount of the sheathing may need to be replaced, depending on how old it is and whether or not any areas have been impacted by storms. This is where it becomes crucial to get the right professional on the project, as they’ll know exactly what materials are required and how to replace them.

The remaining pile of shingles and roof components will be hauled away and disposed of. This is a messy process, but it’s necessary to ensure that the new roof is installed in a clean and pristine environment.

Installation

Replacing your roof is a major project that will be a huge disruption to your daily routine and will take up a lot of time. However, it is important to replace your old and worn roof to avoid further damage to your home and escalating costs.

The installation phase will begin after the roofing contractor has made sure that all the necessary permits have been obtained and that the property is safe for construction. Then, they will cover any parts of your yard or garden that are not directly under the roof with tarps and a dumpster will be brought to collect the old material. Then the roofing crew will start the process of removing your old shingles or tiles. The roofers will also inspect the roof deck for any areas that need to be repaired or replaced.

Once all the old materials are removed, a new layer of underlayment will be added to the roof deck before the new shingles or tiles are laid down. It is vital to ensure that the underlayment is fully watertight before the new shingles or tiles are placed on top, as this will prevent any leaks and protect the structure of your roof for many years to come.

After the underlayment has been installed, the roofing crew will install the new shingles or tiles on your roof. Depending on the type of roof you have, this could be a variety of different types of asphalt shingles, metal tiles, or even wood shakes and slate. The new shingles or tiles will be attached using a strong adhesive, and the edges of your roof will be sealed to protect the interior of your house from rainwater and wind-driven debris.

Finally, the gutters will be cleaned out to remove any shingle or tile debris and the flashing around your chimney, vents and other features of your roof will be replaced as needed. It is essential to use high-quality flashing, which is typically aluminum or galvanized steel, to avoid any water leaks in the future.

The length of time it takes to complete the roof replacement will vary depending on a few factors, such as the size of your roof and the type of new roof you have. The roofing contractors will let you know when the job is scheduled to be completed, and they will work hard to complete the job as quickly as possible to minimize any inconvenience to your home life.

How to Go About the Roof Repair Process

There are many factors to consider when deciding whether to repair or replace your roof. A few major ones include your budget, the damage’s extent, and the roof’s age.

The first step is conducting a thorough Roofing Sun City inspection to identify any areas that require repair. This usually involves checking for leaks, missing shingles, and deteriorating flashing.

1. Removing the Damaged Shingles

roofer

The first step in repairing the roof is to remove the damaged shingles. Use a ladder to access the roof and take all the necessary safety precautions, including a harness and a partner.

Begin by loosening the adhesive underneath the shingle with a flat pry bar. This will help you to remove it without damaging the adjacent shingles. Once the adhesive is loosened, you can pull out the damaged shingle. It’s important to be gentle, as the granules are fragile and can easily be torn off.

It’s also a good idea to inspect the area surrounding the damaged shingle. Often, when one shingle blows off or becomes weathered, others in the same area will follow suit. It’s worth the time to rescuer these shingles before it’s too late, since regularly doing so can extend the life of your roof by years.

Once you’re done removing the old shingle, replace it with a new shingle that’s the same size. Be sure to nail it down with waterproof roofing nails instead of the old ones, as these will last much longer.

Next, remove any remaining nails that were holding the shingle down. Be careful not to puncture the new shingle with these nails, as this could lead to leaks.

If you’re replacing a shingle that’s around a chimney or skylight, be sure to save any metal flashing that may still be intact. You can usually do this by gently pulling nails from it with a pry bar, and then bending it upward to remove the shingles underneath. Also be sure to remove any nails from step flashing (flashing that’s interwoven with the shingles, where the roof abuts a wall) that you want to keep.

2. Removing the Old Flashing

If your roof flashing is damaged, it can lead to costly water damage. In this case, you must remove the old flashing and replace it with new material. It is important to work with experienced professionals for this type of repair. They are fully equipped to handle the job safely, and their workmanship is backed by warranties.

Roof flashing is a vital component of the roof that prevents leaks and other problems by creating an airtight seal at the joints between the roof and other structures like chimneys, skylights, dormers and walls. Flashing is typically made of durable metal that is resistant to rust and other weathering. It is often installed in a stepped fashion that provides an interlocking water-tight structure.

It is important to inspect your flashing regularly and repair it as soon as possible. If left unattended, the caulk and mortar around the flashing can erode over time, allowing water to seep into your home and cause further damage.

To replace the old flashing, first you will need to remove the shingles above the problem area using a pry bar or crowbar. Gently pry up the shingles to expose the flashing underneath. Next, you will need to clean the flashing and surrounding areas thoroughly in preparation for installing the new material.

After the area is clean, you will need to cut a piece of new flashing to size using tin snips. It is important to match the thickness and material of the existing flashing to ensure a tight fit. Before installing the new flashing, you will need to apply roofing cement along the edges to create a watertight seal. For small holes in the flashing, you can use an asphalt patching compound to fill in the hole. Before applying the patch, roughen it up using sandpaper or a wire brush to allow the compound to adhere better.

3. Reattaching the Flashing

A good roof is like a shield that protects everything else in the house. It keeps out fall rains, winter snows, and flying and crawling insects, birds, and animals. But if the shield is broken, everything in the house is vulnerable.

When reattaching the flashing, try to match how it was previously fixed in place. This will give you a better chance of a water-tight seal. If nails are used, they should always be covered by shingles or the siding. Otherwise, use a roofing sealant. Unlike nails, this will not rust and can be safely encased in a piece of flashing. If using step flashing, be sure to select a chimney flashing collar that is correctly sized for the vent pipe size entering and exiting the roof.

4. Applying the New Shingles

If you want your home to be in the best shape possible, and keep its value, a well-maintained roof is key. It’s the first line of defense against falling snow, rain, and debris that can damage everything inside it. It’s important to keep it in good condition, or risk having to spend a lot of money on repairs down the road.

It’s important to know how to shingle a roof correctly in order to avoid leaks and other issues down the road. Fortunately, the process is not as complicated as many homeowners fear. It simply requires a little bit of training and preparation before starting the actual job.

Start by clearing the work area. This means moving any furniture or yard games away from the house and spreading sturdy tarps over any plants that are close to it. The tarps will protect them from dropped tools and other debris.

After clearing the work area, it’s time to start applying the new shingles. This should be done under calm conditions. It’s a good idea to start with the eaves and rake of the roof, and then move onto the rest of the roof as you go.

When installing the first course of shingles, make sure it’s cut to fit properly and that its tab slots line up with those of the existing roof. This will help ensure that the first course of shingles provides adequate weather protection for the rest of the roof. Then, install succeeding courses of shingles using the snapped line as a guide. If the roof has a valley, install new W-shaped flashing made specifically for reroofing jobs. It should be placed over the existing flashing and attached at high points, which are usually the shingle bottoms.

5. Applying the Sealant

It’s important to use a sealant that can hold up against the elements. This will help to prevent moisture from seeping behind flashing, through gaps and other problem areas. Polyurethane sealants are popular as they are effective, long-lasting and easy to apply. They also withstand harsh weather conditions so they will continue to protect your roof after you’ve completed the repair.

Before applying the sealant, you’ll want to make sure that the roof is clean and free of debris. This is especially important if you’re using silicone sealant, as it can easily trap dust and plant debris. Sweep the roof to remove any visible particles and wash it with an organic solvent if necessary. This will help to ensure that the new sealant adheres directly to the roof surface. It’s also a good idea to apply the sealant in the shade as some silicone sealants can be slow to dry.

To apply the sealant, simply load it into a caulking gun and start at the edges of the roof. Work your way around the entire roof, making sure to get into the cracks and crevices. Once you’ve finished, allow the sealant to dry for a few hours before conducting any further maintenance on your roof. You can find more information about this process here.

What Does a Roofer Do?

Roofers, also known as roof mechanics or roofing contractors, specialize in building roofs. They inspect, repair and replace residential and commercial roofs, as well as eaves and gutter systems.

Roofers Corpus Christi use a variety of tools to perform their work, including ladders, roofing shovels and pry bars, hammers, nail guns, drills, utility knives, and pavers. They also work with materials such as asphalt and fiberglass shingles.

Roofers are responsible for the installation, repair and maintenance of roofing systems on commercial, industrial and residential buildings. Their work is vital for the structural integrity and weather protection of buildings, so they need to follow strict safety protocols and have a high level of physical stamina when working at heights. They also need to be comfortable working with a variety of tools and materials.

Roofing contractors often have connections with various suppliers, which can help them get better deals on materials. This can save homeowners a lot of money, especially on high-end or specialty roofing materials that might not be readily available to DIYers. Moreover, professional roofers can usually provide customers with warranties and guarantees for their work, which can give the homeowner peace of mind knowing that any problems that arise during the course of the project will be taken care of without having to pay out of pocket.

Most roofers have extensive on-the-job training before they are qualified to work independently. They begin as apprentices and learn from more experienced workers. They must be proficient in the use of a wide range of hand tools and power equipment, including ladders and scaffolding. They must also be familiar with different roofing materials and techniques, such as laying asphalt or fiberglass shingles, tile roofs or metal roofs, and be able to determine when a roof needs to be repaired or replaced.

The job requires a great deal of balance and endurance, as well as the ability to perform strenuous tasks for hours on end in hot temperatures with little to no breaks. It also requires good customer service skills, as some roofers may need to communicate with customers to assess their needs and recommend the best options for their home or business.

In general, roofers enjoy their jobs, despite the physical demands of the work. The satisfaction they get from repairing and installing high-quality roofing materials gives them purpose and meaning. This is especially true for roofers who are in unions, where they can advance to supervisory roles or start their own roofing businesses.

Education and Training Requirements

Roofers do not typically need to have formal education to become a roofing contractor, although a high school diploma or equivalent is useful. Most roofers learn on the job, working as helpers to experienced roofers. A few organizations, including the United Union of Roofers, Waterproofers & Allied Workers, sponsor apprenticeship programs that combine on-the-job training with classroom instruction. A valid driver’s license is also important for roofing contractors, as they must drive to each job site to transport equipment and materials.

In addition to learning about different types of roofing materials and how to apply them, roofers must undergo comprehensive safety training. This includes proper ladder usage, which involves three points of contact with the ground at all times and always facing the ladder when climbing up or down. Ladder safety training also includes how to set up and properly use fall protection systems. Falling is the leading cause of death in the roofing industry, so these systems can dramatically reduce injuries.

Other necessary skills for roofers include strong balance and good hand-eye coordination. They must be able to follow directions precisely and understand how each tool functions. Often, roofers work on steep slopes at significant heights, so they must be comfortable with these conditions. In addition, roofers must have physical stamina to spend long hours on their feet and bending and stooping, especially in hot weather.

A roofer’s tool kit is extensive and must be kept well-maintained. Depending on the type of roof, they may need to use a variety of tools, including power tools, hammers, roofing shears, crowbars, nail guns, tape measures, pliers, and ladders. Using these tools correctly helps prevent accidents and ensures that the roof is finished properly.

New technologies are improving workplace safety for roofing contractors and other employees. For example, drones can be used for inspections and to measure roof surface areas. Virtual reality and smart gear are also available to help train employees and improve reaction time in emergency situations. Despite these advances, some employers still choose to cut corners and prioritize profits over employee safety. Those companies that do so risk large fines from OSHA.

Working Conditions

Roofers typically work in outdoor conditions and may be exposed to extreme weather. This job can also be physically demanding, requiring significant lifting and climbing. National safety standards and employer-provided training help ensure that roofing workers follow proper technique and are aware of any potential hazards in their environments.

The most common hazards for roofers include falls, burns from bitumen and other chemicals, cuts from tools, and heat stress. Roofers often use ladders to access roofs, and improperly secured ladders can lead to accidents and serious injuries. Because they are working at heights, roofers must wear personal fall arrest systems (PFAS), including harnesses that attach to anchor points on the roof and catch them if they lose their footing.

Other potential hazards include electrical wiring, slick surfaces, and debris. Roofers must be careful not to knock down or damage power lines, and they should always keep a safe distance from energized equipment. In addition, slick surfaces can make it difficult to maintain footing, and hot temperatures can cause dehydration and heat stroke.

To minimize the risk of these hazards, roofers wear work clothes that protect them from environmental conditions and worksite accidents. Hard hats provide head protection, and goggles or safety glasses protect the eyes from flying debris and hazardous materials. In addition, long sleeved shirts and pants protect the skin from sunburn and scrapes. Sturdy footwear prevents falls on uneven or slippery surfaces.

Roofers also use a variety of tools, including hammers, tin snips, drills, and shovels to remove old or damaged roofing material and install new roofing systems. They may also spray roofs, sidings, and walls with material to bind, seal, insulate, or soundproof sections of buildings.

Depending on the type of roofing system being installed, roofers may also need to use scaffolding or other tall structures to reach high areas. Other specialty tools, such as roofing pavers and tape measures, may be used in conjunction with more standard construction tools to create the final product.

Job Outlook

Roofers are needed to install, repair and replace roofs. This important job is vital to the structural integrity of buildings. They are also trained to work in varying weather conditions and can handle different roof types. This is a highly versatile career with good prospects and room to move up the ladder (metaphorically).

In terms of job security, roofing jobs are not as affected by the economy as other construction trades. The demand for roofers is largely driven by the need for new structures and renovations. In addition, roofing contractors can increase business by offering a variety of services that go beyond repairing or installing a roof. These services include installing energy-efficient insulation and attic vents, which can help homeowners save money on heating and cooling bills.

Many roofers work for established roofing contractors, while 19 percent are self-employed. Those who are self-employed must provide their own health and life insurance, as well as retirement savings plans. Those who are employed by companies typically receive benefits such as paid time off and holiday pay, in addition to health insurance and other standard benefits.

The job outlook for roofers is promising, with the industry expected to continue growing at a steady pace. However, the job can be physically demanding and requires a high degree of skill. This is why many people choose to work with a company that offers on-the-job training.

It is recommended that potential roofers have at least a high school diploma or equivalent. Taking classes in mathematics, mechanical drawing and shop is also beneficial. Other qualifications include a valid driver’s license and excellent hand-eye coordination.

To obtain a roofing job, one can search for opportunities on online employment agencies and local newspaper classified ads. Additionally, some vocational schools offer placement services for graduates. The Bureau of Labor Statistics reports that roofers have a low unemployment rate, but there are periods when the industry experiences a slowdown due to a lack of new construction.

The employability rating for this occupation is B, according to CareerExplorer, which indicates that the industry has good hiring potential and will continue to grow. The demand for roofers will likely continue to be strong, as the need for repairs and replacements will always exist.

How to Evaluate Siding Contractors

Siding Contractors install siding on homes to provide protection from the elements. This can help increase the value of the property and reduce maintenance costs. However, not all siding contractors are created equal.

Be sure to choose a reputable siding contractor that is committed to quality results. Look for these characteristics when selecting a siding contractor: a clear, concise contract; transparent pricing; and a work guarantee.

A quality siding contractor is experienced in the industry and can provide an exemplary job. When choosing a contractor, look for a detailed proposal that includes a description of the work to be completed and a list of product manufacturers and colors to be used. It is also important to make sure the contractor is licensed and insured in case any accidents occur while working on your home.

Experienced contractors know how to work with homeowners to create the specific look they desire, improving their curb appeal and boosting home value. They will also be able to recommend materials that align with your budget, home needs and local climate conditions. For example, someone living in an area prone to extreme weather might benefit from fiber cement or vinyl, while those who prioritize energy efficiency may want to consider insulated vinyl siding.

Inexperienced contractors might not have the knowledge or skills to complete the project properly, resulting in water leaks, damage to landscaping and other issues. They might also not understand how the different materials perform under the various weather conditions, which can result in premature wear and tear or a lack of energy efficiency. This can be a huge financial headache for homeowners, especially if the original installation wasn’t done correctly. A good siding contractor will be able to quickly identify and repair any mistakes made during the construction process.

Clear Communication

Whether customers are browsing product galleries on their phones, commenting on local contractor posts in community forums, or sending emails and text messages to ask about services, siding contractors need to be able to respond quickly and clearly. This is particularly true for contractors who rely on omnichannel marketing to connect with customers, as the vast majority of them will use multiple methods to find and research contractors before making a decision.

This means being able to answer questions about what each service entails and how much it costs, and providing quotes that are clear and accurate. It also means being willing to discuss the pros and cons of different siding materials, so that homeowners can make informed decisions about what is right for them and their homes.

The best way to know how a siding contractor communicates with their customers is by asking for references and examples of previous projects they have worked on. A quality contractor will be more than happy to provide this information, so that you can see for yourself the level of skill and attention to detail that goes into their work.

It’s also worth asking if they offer warranties on their work and the materials they use, so that you can be confident in your decision to hire them for your siding replacement project. A good contractor will be able to explain the details of their warranty, including what it covers and when you can expect to have any issues covered.

Transparent Pricing

Professional siding contractors offer transparent pricing. They can give you a detailed proposal that includes product manufacturers and colors, what materials are being used, and how much the project will cost. They should also have simple contract language, so you can easily understand how your payments are being used.

A quality siding contractor will also provide a warranty on their work and the products they use. This is important, because it gives you peace of mind that any issues resulting from the installation will be fixed at no additional cost.

Additionally, many reputable siding contractors are able to offer financing options. This can be helpful if you’re looking to finance the project over the course of a few years. Be sure to ask about the specific terms and conditions of the financing options, as these can vary.

Lastly, good siding contractors have experience installing the type of material you choose for your home. They can help you understand the pros and cons of each type of siding and ensure that your new material is installed properly to avoid issues like leaks, mold, and insect infestation. Additionally, they can install the material in such a way that it will boost your home’s value and make it easier to sell in the future. For example, they can install the panels evenly and parallel to one another so that your house is more attractive and appealing to potential buyers.

Proper Licensing

When hiring a siding contractor, you want to ensure they have the proper licensing and insurance. This protects you from any liability should an accident occur during the project. Additionally, having proper licensing ensures the contractor follows local building codes and obtains all necessary permits. A lack of licensing should be a red flag, as it indicates the contractor isn’t following industry standards and may not be qualified to work on your home.

Another red flag to watch for is a contractor who offers low-quality materials. This can damage your siding and lead to a higher cost of maintenance. A reputable contractor will use high-quality materials that last longer and improve the overall appearance of your home.

A siding contractor should also be able to provide you with proof of their licensing and insurance. This will allow you to compare quotes from different contractors and verify they have the proper coverage to work on your home. In addition, it’s important to hire a contractor who has workers’ compensation insurance in case an employee gets injured on the job.

Choosing a siding contractor can be a stressful task, but you can make an informed decision by having conversations with potential contractors and carefully observing their behavior. Keep an eye out for negative traits such as lack of experience, poor communication, vague pricing, lack of work guarantees, and disrespect for property to ensure you choose the right contractor for your project.

Work Guarantees

When evaluating siding contractors, look for both manufacturer and installation workmanship warranties. These types of warranties are important because they provide you with the peace of mind that your new siding is backed by a reputable company. You can also ask for testimonials from previous clients to see how well the contractor performed on their projects.

A manufacturer warranty guarantees the product itself, whereas a workmanship warranty covers installation issues. The length and coverage of each type of warranty vary by contractor, so it’s worth asking about the specifics before hiring someone to complete your project. It’s also a good idea to ask whether or not they offer warranty renewals to ensure that you are covered should something go wrong down the road.

If you have a problem with your siding after it has been installed, a warranty will help you resolve the issue quickly and easily. However, there are some things that can void your siding’s warranty, including painting the material over without an approved paint color and not registering your warranty. If you have questions about the terms of your warranty, talk with your installer to learn more.

A reputable contractor will be happy to answer any of your questions about their work and warranties. This will give you confidence that you are choosing the best option for your home’s needs. Plus, working with a local contractor supports the community and is more likely to result in a smoother project.

Respect for Property

A siding contractor should respect your property while working on a project. This includes cleaning up after themselves, keeping your work area safe and free of debris, and making sure that all materials are properly stored. In addition, they should be courteous and respectful when communicating with you, addressing all of your questions and concerns. Observe their behavior during these conversations and make note of any instances of rudeness or inconsideration.

During the interview process, you will also want to ask about their experience, how they handle unexpected challenges or delays, and how they ensure the quality of their work. It is a good idea to request and check references from their past customers as well.

Finally, ask about their payment plan and any warranties or guarantees they offer. A reputable contractor should never ask for 100 percent of the cost upfront and should provide a detailed contract with payment details and timelines.

Siding installation or repair is a collaboration between the homeowner and the contractor. A contractor who maintains an open line of communication throughout the entire process can provide valuable feedback, suggestions and recommendations. This is essential for ensuring the success of your siding project. Conversely, a contractor who disregards your needs, is difficult to communicate with or is unable to follow through on promises should be avoided at all costs. By evaluating key traits such as experience, clear communication, transparent pricing, proper licensing and work guarantees, respect for property and adherence to deadlines, you can be confident in your choice of siding contractor.